I was hungry for real Mexican food last week, and so my wonderful husband took me to our local ethnic store (more Puerto Rican than anything), and I found some good poblanos for Chiles Rellenos and Rajas Con Crema. The great thing about the poblano pepper is that it is not too hot, and by extracting the seeds and inner veins, you can make it hardly hot at all if you like, or you can leave all of that in, and it gives you a definite “bite”! Two of my favorite Mexican dishes are made with the poblano pepper.
1. First we’ll take on Chiles Rellenos (i.e., Stuffed Chile Peppers)!
- Roasted Poblanos
First, roast the peppers in the oven until the skin is blackened about as shown in the picture. Be careful the stems do not touch the heating element, or you could start a fire! Then place all roasted peppers on a plate inside a plastic bag –or probably any sealable place –for a few seconds so the humidity can loosen all the skin. This is magical, because if you omit this step, it will be a hot, hard, and tedious job trying to peel the skin off. I have been there! (Maybe that is why I haven’t made these in such a long time!) After a short time of being closed up, open the plastic bag and the skin easily peels right off. (The skin has a bitter taste, and so is better if removed.) Then slice open the pepper and remove as much of the seeds and veins as you want. Leaving them will probably make your chiles rellenos more picante. Removing will likely yield a milder flavor. But don’t blame me if they’re spicy…you never know from pepper to pepper how hot one will be!
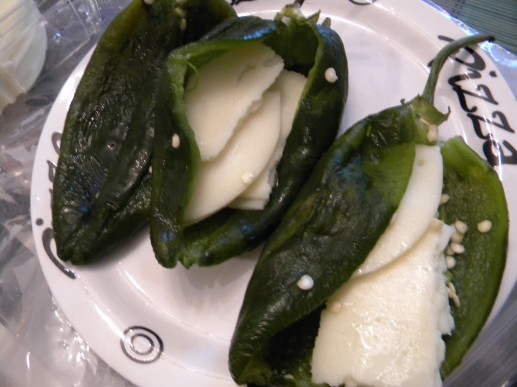
- Stuffing the peppers with cheese
I stuffed them with provolone, because that is what I had. I think the best cheese to stuff them with is probably Queso Oaxaca, a Mexican cheese you might find in an ethnic store if you have one nearby. Oaxaca cheese comes in a knot shape, and you can unravel it. It is stringy like mozzarella. You can probably use just about any cheese you like, though.
- Stuffed and secured with toothpicks
Next, close the peppers with round toothpicks. The toothpicks are easy to detect and remove when you begin to eat! Try biting into a wooden toothpick!
Then, batter and fry the critters. I followed a video tutorial and whipped egg white until very foamy, then stirred in the egg yolk. After that I coated the pepper with flour then dipped it into the egg mixture. Carefully drop it into a frying pan with plenty of hot oil and fry until golden brown (when egg batter is completely cooked).
- Chiles Rellenos ready to eat with tomato salsa
These are usually eaten with a simple tomato salsa (not picante at all). You can just puree a little tomato, garlic, and onion to make your own. (You’ll probably want to salt everything before eating.) I like to pour the tomato salsa all over the chiles until they are almost “swimming” in it! Then add a little crema on top if you have it, –Que rico!
- Closest immitation to Mexican “crema” I have found in the USA!
Crema is one of Mexico’s delicacies. I developed a taste for it while living there. It is not just watered down sour cream, but actual cream. If you go to some villages and get the more natural, fresh stuff, it is actually almost as “set up” as butter. Then you use it as a condiment on your dishes, and it melts into the hot food, cools the picante a little bit, and adds so much rich taste! This table cream made by Nestle is a pretty good imitation to the real thing. Of course it is no comparison to some crema found in Mexico, but it is the closest thing I have found in the U.S. that is not just water-y sour cream! Hmmmm…
2. The next dish I made with poblanos is actually one I prefer above Chiles Rellenos. This one is Rajas Con Crema. Rajas are simply sliced strips of pepper.
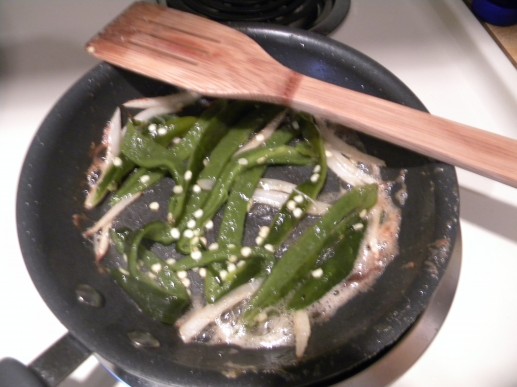
These are made by roasting and peeling the poblanos in the same way as before, but then slicing them in long, narrow strips. Next you sautee a few onion strips in butter, then add the rajas (strips of poblano).
- Onion and poblano rajas sauteeing…with plenty of seeds for spice!
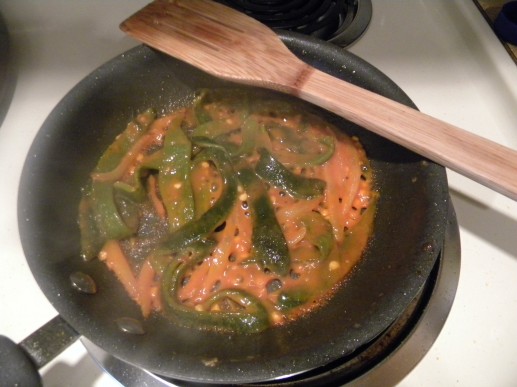
When well heated, add a little of the same tomato salsa mentioned above (a simple puree of tomato, onion, and garlic). And at this point, you can add a bit of canned or fresh corn if desired.
- Rajas, onion slices, and tomato puree
Lastly, remove the mixture from the pan, and add a good amount of crema (discussed above). Serve with warm tortillas (I fill the tortilla with the rajas con crema, and eat it like a taco). This is one of my most favorite Mexican dishes!


